The Invisible War Beneath Your Feet
My old journeyman used to say, ‘Water is lazy, but it’s patient.’ It will find the tiniest pinhole and turn it into a geyser given enough time. But worse than a geyser is the silent infiltration. In three decades of forensic plumbing, I’ve seen boreholes that looked pristine on the surface but were absolute bio-hazards three hundred feet down. You don’t just ‘clean’ a borehole in 2026; you perform a surgical strike against microscopic invaders. When a client calls me because their water smells like a swamp or has a metallic tang that clings to the back of the throat, we aren’t just looking for a leak. We are looking for a failure in the system’s integrity. To fix it, you have to understand the chemistry of the aquifer and the physics of the well casing. Often, the failure starts because of poor site services during the initial rough-in, where the grout seal wasn’t seated deep enough, allowing surface runoff to bypass the natural filtration of the earth.
The Contamination Autopsy: Why Boreholes Fail
Before we touch a drop of bleach, we look at the material science. Most modern boreholes utilize high-density polyethylene (HDPE) or schedule 80 PVC. When these pipes are stressed by shifting soil—the kind of movement we see in expansive clay—the joints can weep. This isn’t a burst; it’s a slow exchange of fluids. Using vacuum excavation to perform daylighting around the wellhead is often my first step. I need to see the pitless adapter without a backhoe ripping the whole thing to shreds. I’ve seen cases where the ‘dope’ used on the threads was a cheap, non-potable grade that literally fed the bacteria we were trying to kill. The result? A thick, rust-colored snot known as iron-reducing bacteria that coats the pump intake, causing the motor to overheat and the water to taste like a handful of old pennies.
“Potable water systems shall be purged of deleterious matter and disinfected prior to utilization.” – IPC Section 602.3.4
Step 1: Pre-Disinfection Assessment and Daylighting
You cannot disinfect what you cannot see. We use vacuum excavation to expose the upper five feet of the casing. We are looking for structural integrity. If the casing is cracked, the disinfectant will just leak into the surrounding soil. This process of daylighting ensures we aren’t pumping chemicals into a sieve. We check the ‘top-out’ height of the casing to ensure it is at least 12 inches above the 100-year flood plain. If it isn’t, you aren’t just drinking well water; you’re drinking whatever the neighbor’s septic tank is leaching out.
Step 2: Calculating the Static Water Column
Disinfection isn’t a ‘pour and pray’ operation. You need to know the exact volume. We measure the static water level from the top of the casing down to the surface, then the total depth of the borehole. If you have a 4-inch casing, you’re looking at roughly 0.65 gallons per foot. Failure to do the math means you either under-dose (letting the bacteria survive and become resistant) or over-dose (eating the copper stub-out pipes inside the house). Precision is the difference between a clean well and a ruined plumbing stack.
Step 3: Chemical Selection—Beyond Grocery Store Bleach
In 2026, we don’t use scented laundry bleach. It has additives that shouldn’t be in your blood. We use NSF/ANSI 60 certified calcium hypochlorite granules or high-strength liquid sodium hypochlorite. The goal is a chlorine concentration of 50 to 200 mg/L throughout the entire system. But here is the plumber’s secret: Chlorine is lazy if the pH is wrong. If your borehole water is alkaline (above pH 8.5), the chlorine stays in its ‘inactive’ form. We often have to use a pH buffer to drop the water to a 6.0 or 7.0 to ensure the chlorine actually kills the biofilm.
Step 4: The Recirculation Loop and Biofilm Scouring
This is where most DIYers fail. You don’t just dump the chemicals in. You have to scrub the inside of that casing. We attach a hose to the house’s cleanout or an exterior bib and run it back into the well. We circulate the chlorinated water for at least two hours. This creates a turbulent flow that scours the slime off the casing walls. Without this, the bacteria stay protected under a layer of biological ‘armor’ and will recolonize the well within forty-eight hours.
“Disinfection of the water supply system shall be accomplished with a chlorine or chloramine solution.” – UPC Section 609.10
Step 5: Dwelling Time and System Saturation
Once the well is ‘shocked,’ you have to pull that water into every stub-out and fixture in the house. We run every faucet until the smell of chlorine is undeniable—that sharp, swimming-pool sting in the nostrils. Then, we shut it down. The system needs to sit for 12 to 24 hours. This is where the chemistry happens. The chlorine is oxidizing the organic matter, breaking down the cell walls of coliforms and E. coli. If you use the toilet during this time, you’re weakening the ‘slug’ of disinfectant. Let it sit.
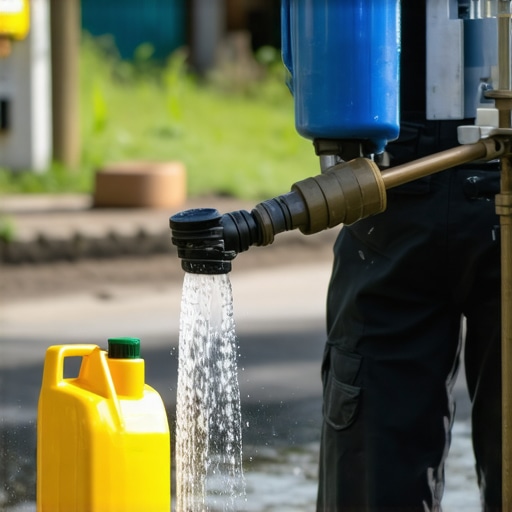
Step 6: High-Velocity Flushing
After the dwelling time, we flush. But you don’t flush into the septic tank—the chlorine will kill the ‘good’ bacteria in the tank, leaving you with a sewage backup that smells like a nightmare. We bypass the softeners and filters and discharge to a safe area using a high-flow hose. We monitor the ‘turbidity’ of the water. Often, the first few minutes will bring up black flakes of oxidized manganese or orange sludge. We keep going until the water is crystal clear and the chlorine residual drops below 1 mg/L. Proper site services ensure this discharge doesn’t erode your landscaping.
Step 7: Post-Disinfection Testing and Maintenance
Never assume it’s clean just because the smell is gone. We wait 48 to 72 hours after flushing to take a sample. We look for ‘Total Coliform’ and ‘E. coli.’ If the test fails, we go back to Step 1. Usually, a failed test means there is a ‘blind’ spot in the plumbing—perhaps an old galvanized stack or a dead-end pipe where water doesn’t circulate. Forensic plumbing is about finding these stagnant pockets and eliminating them. Water is patient, and if you leave one pocket of bacteria, it will wait until the chlorine is gone and start the invasion all over again. For complex systems, choosing the right site services is crucial to ensuring the entire infrastructure is up to code. Buy the right parts, do the math, and remember: Water always wins, so you’d better be on its good side.